fredag 1 maj 2015

Week 3 of Big Game Project - The Track

For the third week of production for Big Game Project we have made a lot of progress. The results of our past work has finally been starting to surface. We have an enjoyable and playable version of the game now that runs smoothly. Everything isn't there yet but we're making good progress.

This week I've mainly worked on generating the tracks for the game. At first we planned to have a spline system in Unity to generate our mesh from but that didn't work out. Luckily, I had a backup plan for if our Spline system failed us or if there wasn't time to implement it. So what I did was to generate the mesh inside 3DS MAX instead, using their own built-in spline system.

There are some kinks to work out when using 3DS MAX's spline system which can be a lot of trouble. The spline system is clumsy overall and you have to really wrestle with it to get it working. 3DS MAX's Path deform is a modifier that I use to make the track mesh follow the spline and it isn't perfect in any way.

I succeeded in generating a simple track with this method and the results were quite good. The process however was very clumsy and not optimal. Here below are some screenshots of the tracks I generated.


Overall it's been a good week, a lot of stuff has been implemented and it's looking good for the project. Thanks for reading.

söndag 26 april 2015

Week 2 of Big Game Project - Making progress

I've now entered week 2 of production for our project and some good progress have been made. Firstly, we finally settled on a name for the game. After a lot of indecision and a few rounds of voting we ended up with TwinShift as a name.

So what have I been doing this week? I've worked on several things including a skybox, environment and tracks. Let's start with the skybox. We needed a skybox for the game that reflected the game world so first I had to look at where the game takes place. The game takes place on a planet far off in space so I had to show that it wasn't as familiar as earth. I tweaked the colors of the skybox to give an alien feeling. You can never go wrong with a couple of planets, some stars and a sun for a skybox.


The skybox looks good in Unity and I am satisfied with how it turned out. It was fun to make a skybox as it isn't something I try my hand at that often.

It has been a very experimental week for me and I've tried many things. One thing I did this week was the terrain which was interesting. At first I tried using Unity's own terrain tool to make the environment but it wasn't really working out. It was very limited in many ways and didn't quite me quite the result I wanted.

I remembered an article I read in a magazine some time ago that described how to use satellite elevation data to generate height maps. These height maps could be used to generate terrain from and give a lifelike and realistic result as it is generated from our own earth. I then proceeded to generate  terrain from some height maps of California. I want to give credits to NASA for making elevation data of earth accessible to everyone. 


As you can see the terrain looks good, it gave good results to use elevation data. I did however move away from Unity's own terrain tool as it was not giving me the amount of control I wanted. Instead I made my own mesh in 3DS max from the height map and made a custom shader to control vertex painted textures.

The last thing I did beside editor work was the track. In the end product the game is supposed to have atleast three or four different types of tracks to provide variation but for this week I only made one. I looked a lot at other racing games to get a track that looks good even when driving at high speeds. I experimented a lot in Unity with Physical Based Rendering or PBR, which helps in achieving a more realistic look. I used the plugin Shader Forge for making the shaders. 


I like how the track turned out, but I'm going to have to tweak it when everything else it in place to make sure that everyone looks correct. That's it for me this week, thanks for reading.


fredag 17 april 2015

Week 1 of Big Game Project - Introduction

I have now entered the first week of production in the course Big Game Project or BGP for short. BGP is a course in which several groups takes on the task of making a game in ten weeks. My role in my group is that of a lead artist, to ensure that the graphics look appealing and uniform. As a lot of the course is preparation, reflection and reports the actual production time for the game is eight weeks.

So what is the project I am working on? I am working on Gravity Grind, a racing game which takes place in a giant scrapyard. The game is set on a planet that is covered with junk and scrap, some buildings remain but most of them have been reduced to rubble. The game draws inspiration from other games like Wipeout HD and F-ZERO GX.

As a lead artist my first task was to create a style guide for the project, this style guide is meant to help us artists and guide us to have uniform visuals, to ensure that we're on the same page. At first I struggled with the style guide, as I have never done a style guide for this big of a production. There's a lot of research involved and it ended up taking a lot of time. I'll link the style guide below.

https://www.dropbox.com/s/myc277vfaqukutr/Styleguide_GravityGrind.pdf?dl=0


I'm pleased with how the style guide turned out and that counts for both the look of it and the content itself. Although there is only four pages, it still communicates the necessary information well. Aside from the style guide I have been active with other stuff this week. That includes a lot of mockups, various editor work in Unity and  starting on making the racing tracks for the game. Below is one of the mockups I made for the game. It was an early prototype to iterate on what kinds of tracks we can have in the game.


Aside from all the art assets produced, I recently got involved with Shader Forge. It's a plugin for Unity that allows you to create shaders with a node-based system, much like in Unreal Engine 4. It's a neat program which allows you to visually create shaders without the need for coding.

That's it for me this week, a bit short but I'm saving the good stuff for next week, see you then!

måndag 17 november 2014

3D - Anatomy knowledge and 3D scanning

I've been doing 3D and 2D for about six years now but it was not until a few years ago that I really started thinking more seriously about it. It started out as a hobby when I got involved in the modding community of Warcraft 3. I was always and still am amazed by the user-created content of Warcraft 3. I started out by doing icons for abilities and later moved on to models, this was without no prior knowledge. I learned by reading tutorials and asking around a forum for help which really got me interested into 3D modeling.

These are some of the icons I made for Warcraft 3

My first character model, fully rigged and animated

In my last year of school before university I, with the guidance of my teacher started looking into anatomy and was introduced to a whole new level of both drawing and modeling. I started learning to draw and bought my first wacom which I still have to this day. My anatomy skills in 2D aren't the best but I'm always practicing it to get better. I actually prefer doing environments over characters. Here below are some pictures of my 2D work, I selected some environments, some characters and thumbnails so you can see different things.

Some of my recent environment drawings


Character thumbnails

Some thumbnail practice
I enjoy doing characters and anatomy in 3D using a sculpting program like Zbrush. You get a lot of control over everything and it's easy to spot mistakes or faults. When I draw in 2D however I like to draw environments more than characters. I do draw traditionally regularly to maintain and improve my skill level and this is mostly where I practice my anatomy when I get the chance to. I am not too confident in drawing characters and I probably need to work on that. I feel that I have the knowledge but I need to learn how to apply it.

I think what I need to do now is just make more characters to get a deeper understanding and build a visual library for anatomy. Practice makes perfect and I especially need to work on the construction of characters. I'll look at disney concept art for construction help since they have a really awesome way of doing things.

Another thing we've been doing recently which I've never done before is 3D scanning. 3D scanning is basically a way to put a real life object into the digital world. You do this by taking multiple pictures from different angles and then letting a software construct a model using the pictures you provided. I haven't really tried it before but it's a really awesome and effective way of getting realistic results.


Here above is a 3D scanned head that we started working on in class. You get really nice results from making low polys from 3D scans since they are imported from reality. Just bake the lighting and the texture and you got a really nice model that can look very close to the original 3D scan. I haven't really experimented that much with photogammetry but I'm considering buying a good camera and some lighting tools for 3D scanning. Thanks for reading!


söndag 9 november 2014

3D - Finishing up

This is my last blog post for this course I've been taking. I'll talk about the creation of my wolf, how it turned out and some final thoughts. Last post I presented my character background and I will now show you what I've done and how it turned out. This was quite a challenge and a brand new experience seeing as it is my first time making an animal.

My first goal was to get the overall shape of the wolf right. I did this by modeling a low poly directly from the concept turnaround by placing it as a plane. The concept turnaround wasn't perfect since the wolf is in a walk cycle and some parts aren't properly lined up. Nonetheless it still is an awesome concept and there's no need to get picky. My main concern was getting the proportions right. When working with organic recognizable creatures such as humans, dogs or cats it's hard to get things right anatomically. Since everyone knows how these look, anatomical faults stands out more. When designing fantasy looking one often tends to exaggerate on certain parts. I had to make it look believeable and still retain the exaggerations of the concept.


The low poly turned out pretty okay for a rough prototype. I made the decision to make a hipoly model in zbrush to try and capture that feeling of authenticity. This was a very time consuming process because this also required me to retopo the model after I was done. I started by just sculpting around in Zbrush to try and find some nice shapes and just refine things.

After playing around for a while I decided it was time to start checking references. I put in a lot of time into the high poly and I constantly alt tabbed to check my references. I would look up things like: "Wolf muscle anatomy", "Wolf paw" and "Wolf profile". I had originally designed a moodboard but I found that my current moodboard was not enough so I googled search like a madman for the entirety of the high poly. One of the big challenges for this model was the fur which I will talk more about later on but when I modeled the high poly I did so with in mind that fur would come on later in the process. I basically modeled the high poly without fur which helped me in modeling the muscles. Since all the reference pictures I looked up were of wolves with thick fur it was hard to find what was underneath all that fur, I had to fill in a lot of empty spaces with my imagination.

Here's the final high poly with some basic poly paint applied to it.

Here's the moodboard of pictures I collected in the pre-production phase

Great, the high poly is completed and now it's time for retopo in 3Dcoat. This was also a time-consuming phase seeing as I wanted to get a good edge flow. I thought I could save time by relying on Zbrush's Zremesher or 3Dcoat's Autopo making the low poly for me but this was what took up the most time. I spent several hours just configuring and trying different things with both programs and I never got good results. I figured it wasn't working out for me so I started doing it manually in 3Dcoat using strokes which is f*cking awesome. You can really plan your edgeflow with 3Dcoat's strokes. So I did some retopoing and I ended up with a pretty neat edgeflow.

Here's how I worked with the strokes function in 3Dcoat, really liking it.

The finished low poly.

Although I liked the edge flow and the retopo I was shocked to find out that I was way over poly budget. Originally I had intented for roughly 2000 tris for the body and the rest on fur and eyeballs, the target was 3000 tris on the finished model. I was already having about 2600 tris on the main body, before the fur and eyeballs were added but there wasn't time enough to change anything so I decided to work with it. The UV mapping on the body went pretty smoothly and there's not much to say about that. I baked the poly paint, normal and lighting information from the high poly now which makes up for my texture.

Low poly, UV mapped and textured

Now for the thing that I struggled with the most, the fur. This was really, really difficult for me. The plan was to use lots of planes, alpha and a good texture to make the fur. I was already running out polys so I didn't really have much to work with. One thing I noticed was that doing fur is really hard. I experimented so much on the fur. Trying different planes from different angles with different textures. I just couldn't get it right and time just ran out. I had to send in an unfinished product which saddens me. I think I have a solid construction but I'm working towards a deadline and I must deliver on time even if it's not finished. So in the midst of all the fur experimenting I had to wrap up and settle on something. I'm dissatisfied with the end result and I know I have a lot more to offer than this. Not everything was shit though, the high poly and the edge flow of the low poly turned out good. I think I captured the organic feel I was going for, it doesn't look completely shit.


All in all I've learned invaluable lessons from these past two assignments. I need to adjust my scope and prioritize better. In these both assignments I've spent way too much time on the high poly when there's not much time available and that's something I will take into consideration for my next model.

So what about the course? This is probably the last post about this 3D I course and I want to talk a little about it. This course has been amazing, my teacher has been amazing and all my fellow classmates have been amazing. Some of my classmates have never used 3D prior to this course and they've worked really hard and produced amazing stuff. I believe everyone have supported eachother really well and the atmosphere has been great overall. As an aspiring 3D artist I have grown over these past 10 weeks and am now stronger than ever. This was all for this course and I hope you'll be reading my blog in the future.


torsdag 6 november 2014

3D - Wolf character

A little while ago I started working on a character model for school. The assignment was to first choose concept art of a character and give it a backstory. After pre-production you are to make a low poly with a good organic edgeflow, maximum 3k tris. It is then to be UV mapped and textured at a 1024x1024 resolution so you're really limited with both tris and resolution.

I haven't completed my model yet but I believe I'm well on my way. As for what concept I chose I felt that I didn't want to do anything I've done before so I ended up looking up animals instead. After looking for a while I found a really cool concept of a feral wolf.  I really like how this looks and I'm looking forward to making the fur. Here below is some pictures and after that is the backstory I planned for the character.

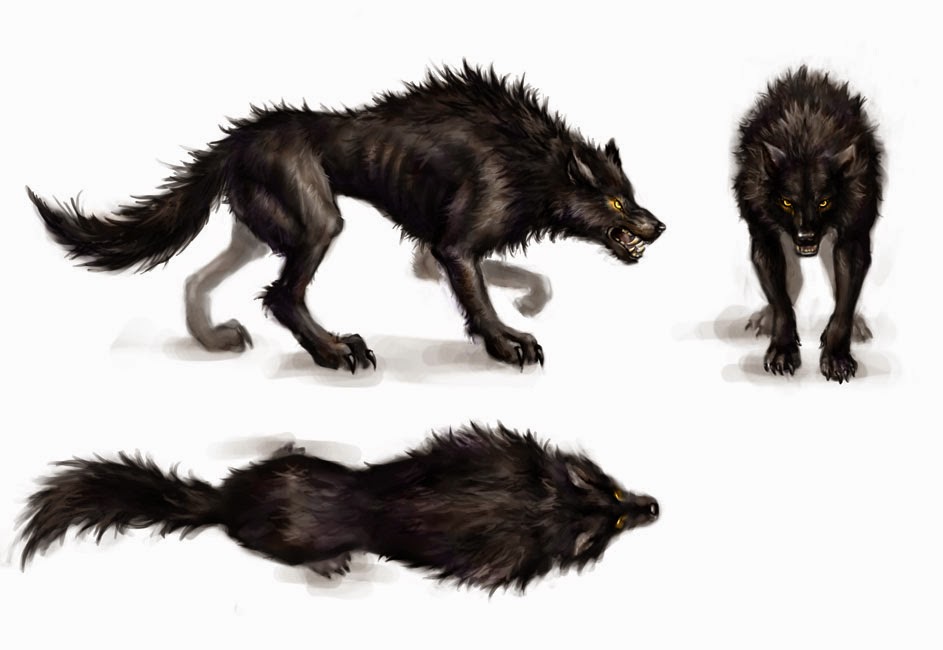
Here's the concept I decided on. While the turn around isn't perfect (the wolf is in a walk cycle and things aren't lined up) I still have a lot to go on.

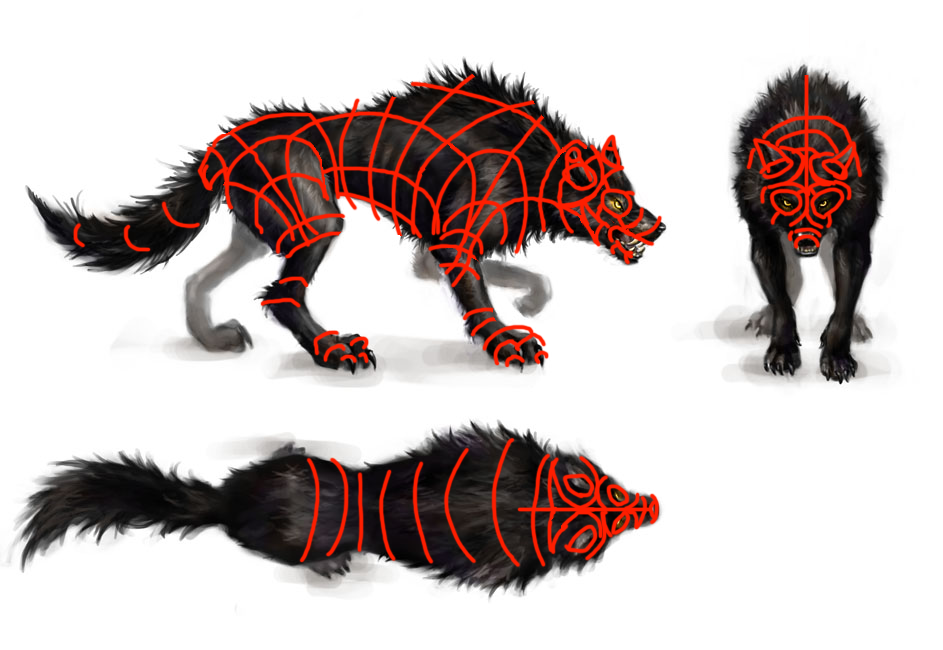
A quick draw over to plan my edgeflow

Name: Gnaw

Appearance: A gigantic male dire wolf with rugged ink-black fur, rivaling even a grizzly bear in size. A first impression would only describe Gnaw as ferocious, deadly and yet majestic.
A yellow glowing stare that pierces through the night and razorsharp fangs and claws surely you wouldn't want to have a meeting with this wolf.

Huge dire wolves like Gnaw tend to live long lives, longer  than your average human under the right condititions. Though age unknown Gnaw has been around long enough to have tales told and songs sung about him. Even among dire wolves Gnaw is special, he has been around for atleast 90 years.

Gnaw's body is made for combat and hunting, a predator at heart. Under his thick rugged fur lies countless scars from various battles. As one of the most powerful creature on the top of the food chain, Gnaw dislikes being toyed with and controlled. He has an iron will and a strong mental fortitude.

Gnaw wanders around his den in the forest with his four predatory legs. It is not unusual for him to move out of his territory occasionally, usually to hunt new prey or defeat rivals. When hunting he moves swiftly and stealthily, although his huge body makes it harder. Prefers to hunt alone.

Gnaw prefers to eat prey that can fight back, large animals like moose or bears although they do not put up much of a fight. His absolute favourite food though is the blood and flesh of his enemies or rivals. Gnaw wants tough prey like sabre toothes or mammoths and after his victory he eats them in an almost ritual-like manner. His opinions on humans are that they are weak, fragile creature that only act as irritation for the grander matter of things. They attempt to use weapons and fire to drive Gnaw away but it is futile seeing how dwarfed they are by this ferocious dire wolf. Even in larger numbers they eventually flee for their lives, weapons left behind. Although the weapons do make for nice decorations by his lair.

Although he is talented with tactics and has a high intelligence he prefers to play with his prey. If there is no challenge, make one. He gives his enemies a significant advantage in fights and hunts so he can enjoy himself. He is more for physical challenges than intellectual ones and tries not to think too much.

Not much is known about Gnaw, he just simply appeared one day and changed the hierarchy of the forests. Many have tried to best him in combat, all have lost and few land a wound on him. There are times when enemies would come to ambush Gnaw in packs but his combat prowess and intimidation would end up scaring them away although many of his scars were from those ambushes. His biggest secret is what took place before his appearance. His childhood must have had quite the impression on him seeing as he is now.

His main goal in life is much related to his hobby which is fighting with his life on the line and winning. All he really wants is the title of the strongest although a lonewolf it his to himself he must prove his worth. He is continually expanding his territory to prove his worth and defeat new enemies. 

And that's his background, I left a lot of things untold to preserve his mysterious image and let other people fill in the blanks so they can create their own theories. This character would fit very well into a game like Dark Souls as a boss. He is dangerous and intimidating, if he was a boss in a game I'm sure that the player will be backed up into a corner and fighting for his life. You would play as some kind of warrior or knight and Gnaw would be a major obstacle to overcome.

This would fit best on a console as they tend to immerse the player more than sitting on a PC with distractions, also for the comfortable controls. The target audience for this game would be players who enjoys challenges and like exploring the world and learning more about it. I tried to describe the game world I can see Gnaw fitting in below with some crappy rhymes because why not!

Glowing eyes lurking in a dark misty land.
In the forests deep a spider's web so grand.
Wyverns soaring in the sky roaming around mountains of heaven high, 
forests thicker than the darkest blood and fierce rivers just waiting to flood.

This world has a very chaotic eco system as there are many dangerous creatures lurking about, Gnaw being one of them. So in this world Gnaw would be the baddest of the bad and you would probably end up fighting him sooner or later. Well that's it for me, my next post will be more on the actual production of Gnaw. I'll show you the process I'm using in his creation and my final results. Thanks for reading!

måndag 27 oktober 2014

3D - Finishing the mech

Hello, I've been horrible at updating the blog lately so I'll try to catch up. If you've read my previous posts you'll know that I've been working on a mech. The tools I used for this was 3DS MAX for modeling and Photoshop with DDO plugin for texturing. I've actually completed it so I'll show you a little of what I did and how I did it. Here below is the concept art I was following for this model.


Last post I had just started fleshing out the shape and not much was really done. After that I started working on a high poly model since the plan was to use my high poly in the creation of the final low poly. By using the light and shadow information from the high poly you can transfer the details into the texture of the final low poly model. I actually started with the legs for the high poly instead of the main body. I really wanted to capture that mechanical feel of it all so I focused a lot on the details of the leg.


The next step was the main body and it proved to be a much bigger challenge than I originally had anticipated. Trying to translate the concept art to 3D space was a tedious and hard work. The concept art doesn't tell everything about the object so you have to fill in the blanks. Luckily I had gathered good references which helped me in the process. Here below you can see two screenshots of the high poly model, the first one is the high poly nearing its completion and the second and third is the final high poly.


This was about two weeks in or something in the project and I unfortunately got sick. This resulted in me not working on the mech for a week and falling behind schedule. After this pause in production I had to pick up my pace and I was already behind. The next task at hand was to model the low poly and that was not an easy task because I had to have it around 15000 tris. It was a real tough job to reduce my mesh to 15000. The legs especially ended up taking up too much polygons so I worked on reducing them a lot. Below is the finished low poly which I made in haste due to being behind schedule.


The next part was UV mapping, baking and texturing. I hadn't put much time into the low poly which made the UV mapping harder. The wireframe was confusing and rough that gave me a lot more work to be done. After the UV mapping was done I started rendering out lighting maps for texturing from the high poly. There were so many small parts in the mesh which complicated the baking process a lot. I rendered out atleast 200 bad 4096x4096 resolution lighting textures that were scrapped due to me having some technical issues. I also used a color map to help with the texturing, it really helps when you have different materials on your mesh. The first picture below is the lighting map followed by a set of the final textures and a color map.


The textures ended up okay but they would be better if the mesh and UV map was better. The UV map is very inefficient so it doesn't look to good close up. You have to work with what resources and time you have sometimes though. And lastly the thing that you all have been waiting for, the final model. I added in a few neat screenshots I took during the process also, first two are in UDK, middle in max with wireframe and last two are rendered in Marmoset.


My final thoughts on the mech? Oh I don't know... I think the high poly looks great and the low poly is okay but the UV map is what I'm most dissatisfied with. I had to rush a lot of things with this model which ended up biting me in the ass but considering the time I put down I did an okay job. This mech deserves a lot more polish than it got and I might even go back and redo the lowpoly and the UV map but as for now it's complete. When I got back on track after being sick and rushed the process I was a self-loathing piece of shit because I knew every step of the way from the low poly to the UV map that I was doing it wrongly and poorly but I really wanted to have something finished in time.

I believe I captured the concept art pretty well. As it is now it looks good from an RTS perspective but not up close. This was intended to fit in a Battlefield 2142 type game so it needs to look good up close. I hope to revisit this model in the near future and give it the love and care it deserves. It's been a learning experience and great joy to work on. Thanks for reading!